It has been a whirlwind summer thus far. Actually, make that a whirlwind year! I've been travelling like crazy (counting at least 20 different flights, 6 of them international) and trying to work like crazy so I can graduate soon. Sadly, even though I have so much to blog about, all this activity has left me little time to do so. Nevertheless, I try to cook whenever I can and in this searing summer heat, I like to make easy dishes that will minimize oven time. As they say, if you can't stand the heat, get out of the kitchen. And I'm one weird tropical girl who really detests heat!
Thanks to all the debauchery and busy schedule I had this year, I seriously need to go on a diet! With the heat and diet, salads have been my saving grace this summer. I know salads don't exactly conjure up the most fantastic, delicious images in most people's minds, but I think that with a little creativity and some sense of adventure, it could be scrumptious, healthy and oh so easy at the same time. My ultimate secret weapon for salads? Great dressing.
Specifically, I'm really into Japanese-style sesame dressing. It's commonly used not only as salad dressing, but also as a dipping sauce for grilled meats in Japanese restaurants. This dressing goes with almost every green and protein, but it is best with softer baby greens, such as spinach. I first got hooked by this dressing when I was eating at a bbq restaurant in Tokyo, where the thinly-sliced beef was served with a fragrant, nutty sesame dip.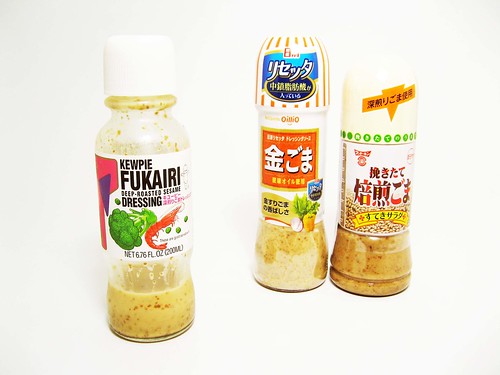
There are many different brands of sesame dressing at the ethnic grocery store, which led me to experiment a little bit. I noticed that the consistency of the dressings vary widely. You can check them out by turning the bottles upside down and observing how quickly (or slowly) the dressing "moves". Thus far, the slower they are, the better. The "slow" sesame dressings tend to be more flavorful and nuttier. I also find that you can use way less of the "slow" dressings for the same degree of flavor. As you can see above, the color of the dressings are also different, I'm guessing due to the different degree of roasting that was done in the production process.
So, for dinner last night, I decided to make one of my favorite salads: a bed of soft baby spinach topped with lightly sauteed garlic shrimp. And of course, it will be served with a drizzling of the sesame dressing.
Recipe for Favorite Garlic Shrimp Spinach Salad
Ingredients:
1 Tbsp olive or canola or vegetable oil
Minced garlic
Salt
Pepper
Shrimp
Baby spinach (or any other greens of your choice)
Japanese-style sesame dressing
Heat oil on non-stick pan.
Add shrimp and garlic to hot pan.
Season the shrimp to taste with salt and pepper.
Once the shrimp has been cooking on one side for at most 3 minutes, flip them over one by one.
Cook another two minutes.
Remove from heat. Pile shrimp on top of the baby spinach. Drizzle with sesame dressing and enjoy!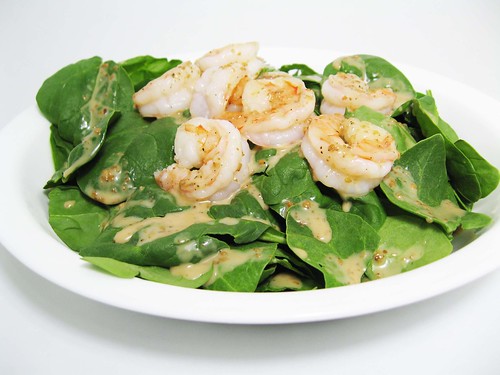
Thursday, August 7, 2008
Staying cool...
Wednesday, June 11, 2008
No muss, no fuss Classic Roast Chicken
It is with much regret that I didn't have sufficient stomach space to try a roast chicken while I was in Paris. The aroma of whole chicken being roasted kept wafting to my nose, seducing me as I roam the markets of Paris. Armed with a determination to satiate my craving for this classic, I made my own poulet rosti at home.
I started looking online for recipes and observed that the highest-rated recipes are the very simplest; so simple that there are only 3 ingredients: chicken, salt and pepper. When I read up more about roasting poultry, there are a few tips to keep in mind which will result in a moist, juicy bird trapped by thin, perfectly crisped skin.
First, you should never EVER (and I mean, NEVER EVER) pierce the skin before cooking. This will create holes through which those precious chicken juices to evaporate in the high heat of the oven, resulting in a yucky dry bird.
Second, it's imperative to dry the uncooked bird as much as possible. This involves pouring out the thawed liquids out of its cavity and letting paper towels absorb the excess water on the chicken skin. This will let the skin crisp beautifully and prevent the bird from being steamed from the innard liquids.
Third, like roasting beef, you have to let the cooked bird sit for 10-15 minutes before you start digging in; not only so you won't burn your tongue, but also to let the juices re-distribute throughout the whole bird.
Fourth, if you want to check the status of your bird by opening the oven periodically, DON'T! This lets heat escape from the oven and prevents your bird from having an even roasting temperature. Unless you have one of those fancy schmancy clear-doored oven, just leave the bird alone during the duration of cooking time!
Who knew that taking these simple, no muss, no fuss steps would give you a perfectly-roasted chicken? :)
Recipe for Classic Roasted Chicken
Ingredients:
1 three- to four-pound chicken
Salt
Pepper
Pre-heat oven to 450 deg Fahrenheit.
Drain liquid from chicken cavity and pat the outside dry with paper towel.
Season the cavity and the outside of the chicken generously with salt and pepper.
Place seasoned chicken on roasting pan.
Roast at 450 deg Fahrenheit for 50-60 minutes.
Let chicken rest for at least 10 minutes before enjoying.
I think this recipe gives you a roasted chicken so delicious that it can be enjoyed naked, by itself. But, if you're going to serve it alongside something else, it's very good atop a bed of baby greens with a scant drizzle of vinaigrette, as meat for a sandwich or with a side of baked potato. But you know what? Why ruin perfection? The only accompaniments this roast chicken needs are a tall glass of iced beverage and plenty of napkins!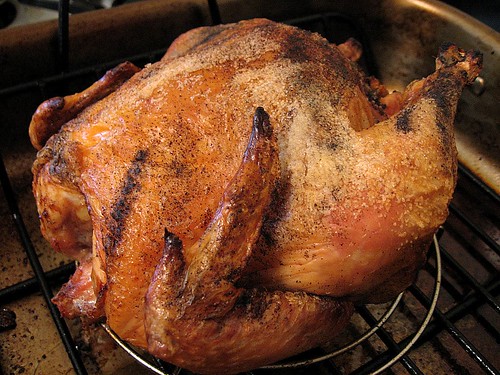
Thursday, March 6, 2008
Devilled egg: simple party food with staple ingredients
A friend graciously invited a bunch of us for the Project Runway finale viewing at her place. Our Molecular Nutrition graduate program is famous (or is it notorious?) for loving our food. I mean, seriously, Nutrition program equals food, right? :)
Well, anyway, it was a potluck and I decided to bring something salty instead of my usual forays into the land of desserts. This is not my first time making these devilled eggs. I first made these for another friend's wine party earlier this year. Devilled eggs are no-fuss to make and are so delicious and nutritious; they belong in every party tray. Here's how I made mine...
Start with some nice-looking eggs.
Place the eggs in a pot and cover with room temperature water.
Next, bring water to a roiling boil and let the eggs boil for 5 minutes. Then, put the pot lid on and leave for 10 minutes.
Pour hot water out of pan and to make it cool faster, add tap water into the pot and leave for 5 minutes.
Next, peel the eggs. This is probably the most time-consuming part of the recipe, but I figured out a simple way to do it. Tap the egg on a hard surface lightly until it is cracked all over (and I mean ALL OVER). Now, start peeling from a spot. I was able to peel the egg easily, by pulling out the membrane layer underneath the shell. For one egg, I peeled off the shell in one piece ;)
Cut each egg lengthwise.
Scoop out the yolk into a medium-sized bowl and place the "hollowed" egg white shell on a platter with "hollowed" face up.
Once you've cut and scooped out all the eggs, mash the yolks. Add salt, pepper, paprika and Dijon mustard to your taste. You can add some mayo if you'd like it to be smoother. If you're piping out the mashed yolk mixture, it's recommended that you add the mayo for easier piping.
Scoop about a teaspoon of mashed yolk mixture on the hollowed egg white. If you want to be fancy schmancy, you can pipe the yolk mixture on.
At the end, garnish with a dash of paprika, sprig of dill or a sliver of chive. For a more substantial bite, you can top each with a teeny weeny slice of smoked salmon.
Now, isn't that a fierce?
Friday, January 18, 2008
Gawd, I'm so Asian!
It's been a rough week. Not only has my experiments tanked (as usual), it is frigid here in Chicago. I walked home from the lab earlier this evening and by the time I got home, my cheeks and thighs were frozen solid! But there's nothing a bowl of homemade soup can't warm up immediately, so I made miso soup.
Miso soup equates comfort to me. I grew up eating Japanese food pretty regularly because my parents love Japanese food. So, what is miso anyway? Miso is basically fermented soy bean paste. There are a few types of miso; namely, white, red and black miso. Miso soup is a Japanese culinary staple but miso itself is increasingly used in many other contexts, such as glaze on fish and in sauces. A few factors that determine the flavor of miso include the length of fermentation and the other raw materials added to it. Other grains that have been used include barley, quinoa and adzuki. Unfortunately, the miso I happen to have in my possesion isn't that exciting. It's just plain reduced sodium misoshiru, but it'll have to do! Don't you just love that the Japanese always uses cute cartoon characters on everything? Even miso! :)
I started off by boiling a quart of water in a saucepan before putting a dashi bag in the boiling water for 5 minutes. Dashi is another uniquely Japanese ingredient that is analogous to bouillon but is flavored with kombu (edible kelp). The dashi bags I have happen to also have bonito flavor. The term "bonito" refers to a species of predatory fish that belongs in the mackerel family. Again, it gives dishes a distinctly Japanese flavor.
While boiling the dashi bag, I diced some tofu and some green onion. Miso is an incredibly versatile ingredient. Besides tofu and seaweed, which are the most popular "fillings" of miso soup, you can many other things such as shellfish, mushrooms and noodles. I love love love tofu so I added a whole block of tofu to my soup. I'm so Asian sometimes, haha!
After boiling the tofu for about another 5 minutes, I turned off the heat and removed the pan from the stove. After letting it cool for a few minutes, I stirred in two tablespoons of the delicious miso. It can take a few minutes for the miso to dissolve, especially if it is cold. It's crucial to never EVER boil miso and to add the miso paste only after you removed the soup from the heat. Boiling miso will create a bitter flavor and destroy the beneficial cultures. 
I topped my miso soup with sliced green onions and I had to have two whole servings! Other toppings include fried scallions (which is such an Indonesian thing to do) and seaweed. Homemade miso soup is the perfect remedy to a frigid Chicago winter day.
Recipe for Miso Soup
Ingredients:
1 quart water
1 dashi stock bag
1/2 of a 16-oz block of your favorite tofu (you can use the whole block if you love tofu, like me), diced
2 Tbsp. miso paste
Sliced green onion
Bring the water to a roiling boil in a saucepan. Put the dashi bag in the boiling water and let it continue to boil for 5 minutes.
Take the dashi bag out and add the diced tofu. Boil another 5 minutes.
Remove from heat. Add dashi and stir until it dissolves.
Ladle into bowl, top with sliced green onions and itadakimasu!
Wednesday, January 2, 2008
Happy New Year to one and all!
The holiday season is almost over and I must say that I'm actually relieved. As you may know already, I was stuck in Chicago for the holiday season and ended up going in to work every day the whole month (and counting). It is days like these that makes me rethink the wisdom of my career choice. But anyhoo, the holiday season has been rather toxic nutritionally for me, what with sugary, chocolatey goodness tempting me from every single corner. I must say that I wasn't so effective at combating these tasty temptations and I've decided that I need to detox for the New Year, which brings me to my New Year resolutions.
Of course, there's the requisite resolution of losing weight and leading a more healthy lifestyle, but the one resolution that I think will be more manageable and achievable is to try something new culinarily at least every other week. This includes eating or making a new food I've never eaten or made before. I must say that I've made pretty good progress on this one resolution because I have tried one thing that I've never had before today: caviar. I've heard many rave about this luxurious, exquisite food and I've always been curious about it.
Considered a luxurious food item, real caviar is the processed, salted roe of the sturgeon. The most expensive are from the Beluga, Ossetra and Sevruga varieties. It is often used as garnish or served as an hors d'euvres with creme fraiche on a cracker or mini pancake. A friend of mine was nice enough to buy me a 2-ounce container of paddlefish caviar to further this project of mine. Sure, it may not be "real" caviar, but hey, grad students can't be choosers :)
I figured that since I was going to pursue such a luxury, I had to do it right. Upon more research, classically, caviar is served with a touch of creme fraiche on blini, which is a yeast-raised buckwheat pancake. I found this recipe on Epicurious and substituted some ingredients with whatever I had in my pantry. We started by mixing the yeast with warm water and sugar before letting it stand for 5 minutes until foamy, just to ensure that this dear eukaryotic microorganisms are still alive and well.
Then, the flours, salt, milk, eggs and butter were added to yield a thin batter that looks like this.
The batter was covered with plastic wrap and left to raise for about 2 hours, after which it looked a lot livelier and doughier, which was pretty darn cool! I've never made yeast-raised pancakes before and at this point, I wasn't really sure whether this was what it was supposed to look like, but I went ahead with it anyway.
For this purpose, I heated my nonstick skillet and sprayed it with some canola oil before spooning one tablespoon of the batter onto the skillet for each pancake or blin.
Like making normal pancakes, we wait until the bubbles have populated the surface before turning it and continue to cook until the blinis are browned on both sides. I found that about 1-2 minutes on each side sufficed.
The blinis turned out beautifully fluffy and light. The buckwheat flour, I think, adds a faint nutty flavor to it, which I liked. It was pretty darn good by itself, though a tad bland. It is so fluffy that I think I'm a buckwheat flour convert when it comes to pancakes. I might just start making yeast-raised pancakes too!
So, back to the highlight of this project, the caviar. Due to the unavailability of creme fraiche at my neighbourhood grocery store, I resorted to fat-free sour cream (my generous friend has a health condition that almost bans fat in his diet). Topped with a teaspoonful of sour cream, the blinis are ready for the star of the show. We then spooned a bit of the caviar onto each blini. Doesn't it look beautiful?
I must say that even though I've never had caviar before, the taste is very familiar. It's not terribly fishy, as I expected it to be, but it quite salty, which was definitely brought out by the (relative) blandness of sour cream and blinis. Many told me that superior caviars are in fact, not very salty. Good caviars contain less than 4% salt. It has a yummy crunchiness and I like that the flavor just invades the whole mouth once I bit into these dark, luxurious orbs.
At the end of the day, it was rather interesting. I wouldn't mind trying out the better sturgeon caviars that aren't as salty, but I'm not going to go out of my way to seek out the best caviar. After all, it isn't really within my humble budget. However, I loved loved loved the blinis. Those yeast-raised buckwheat pancakes were so good, even with my minot ingredient adjustments. I will definitely make the blinis again. The recipe's below and any ideas what would make a nice topping for this nutty, fluffy pancake?
Recipe for yeast-raised buckwheat pancakes (Blinis)
Ingredients:
1/4 cup warm water
1 1/4 teasp. instant yeast
1 1/2 Tbsp. sugar
1/2 cup sifted AP flour
1/2 cup sifted buckwheat flour
1/4 teasp. salt
1 cup warm skim milk
3 Tbsp. butter, melted and cooled
2 large eggs, lightly beaten
Stir together warm water and sugar with yeast. Let stand 5 minutes until foamy. If it doesn't foam, start with new yeast.
Add the flours, salt, milk, butter and eggs.
Cover bowl with plastic wrap and place in a roasting pan filled with about an inch of warm water.
Let rise for 1 1/2 to 2 hours until the batter has expanded in volume and has bubbles on the surface.
Heat nonstick skillet and spray on it some canola oil (or you can use melted butter if you want). Spoon one tablespoon batter for each pancake. Depending on the size of the skillet, you can probably work in batches of 3 each time.
Turn pancakes once bubbles surface and let cook for another minute or two.
These are perfect with creme fraiche and caviar, or simply with some berry jam and cream. Enjoy!
Friday, November 16, 2007
One special sistah!
Once upon a time, about 22 years ago on this day to be exact, a human being was born into this world. I met her for the first time on my parents' bed and I remember being amazed how anyone can exist in such a small body, peer through such teeny weeny eyes and grasp so tightly with such chubby, short fingers. She's my sister :)
I used the Indonesian slang word "gemas" to describe her. It doesn't have an exact English translation but it's along the line of "adorable", "huggable" and "scrumptious" at the same time. Don't worry, it didn't even cross my mind to eat her! Growing up, I remember her wanting to follow me and emulate me all the time. As any older sister can tell you, I found this immensely irritating in a cocky big sister way.
We spent a lot of our formative years apart. I started school in Singapore at the age of 7 while my parents and sister lived in Indonesia. She came to Singapore when she turned 11 and I left for college in Chicago a few years later. Despite the short time we had together, I had beautiful memories of growing up with my sister. We used to listen to Beethoven's Moonlight Sonata in our room while peering out the window, admiring the sunset. I also recall the fun we had organizing a surprise birthday party for our cousin.
It certainly helps to have a sibling who totally understands the unique, crazy family that surrounds us. A sibling is also useful sometimes to diffuse the nervous energy or attention that parents sometimes have for their children. I'm especially grateful that despite the physical distance between us most of the time, we have managed to grow up together. I'm also very happy that we've grown closer and closer over the years. I can't imagine having grown up without my sister and can only wonder how horrible life would be without her.
So when she said she wanted homemade oatmeal raisin cookies for her birthday, I immediately rolled up my sleeves and baked the best oatmeal raising cookies that I've ever baked. The secret ingredient? A little bit of honey and a whole lotta love! Haha! Corny, I know but true!
These cookies turned out to have crisp, thin outer layer while remaining chewy inside. They aren't excessively sweet and they're relatively good for you. Hey! Raisins contain a lot of antioxidants and oats are very fibrous! Try out the recipe below :)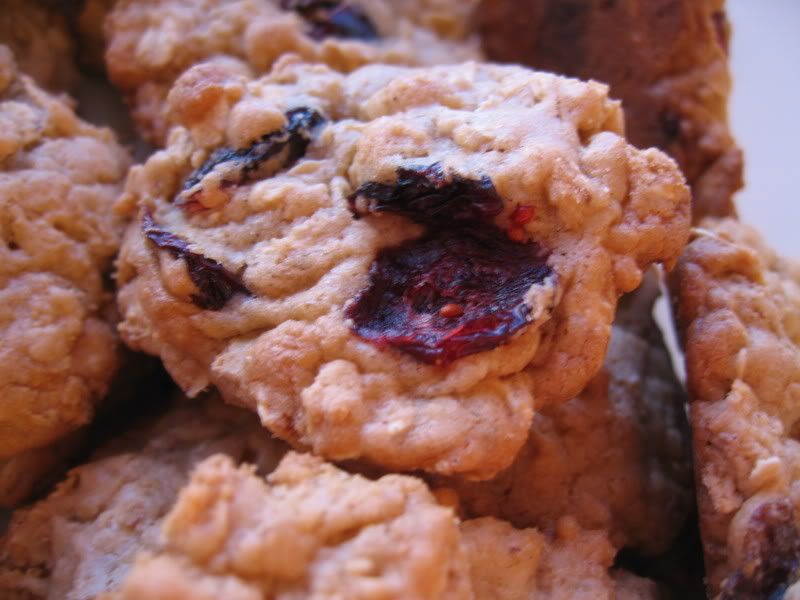
So, I want to dedicate this post to the one I love: my dear little sister. I want to wish her a healthy, happy, wonderful year ahead. And I look forward to more years of growth (and gossip!) with her!
Recipe for the best Oatmeal Raisin Cookies ever!
Ingredients:
1 cup butter
1 1/4 cup packed brown sugar
2 eggs, lightly beaten
2 teasp. vanilla extract
1 Tbsp. honey
1 1/2 cup AP flour (can substitute up to half with whole wheat)
1 teasp. baking soda
1 teasp. ground cinnamon
3 cups rolled oats
1 cup raisins
Preheat oven to 350 deg. F.
Cream room temp. butter with brown sugar until smooth. Stir in eggs, vanilla extract and honey.
Sift flour, baking soda and cinnamon. Stir dry ingredients into creamed butter mixture 1/3 at a time. Stir in the oats and raisins until just incorporated.
Drop dough by the teaspoon onto cookie sheet. Flatten slightly with the back of spoon if you like flatter, crisp yet chewy cookies. You can leave the dough rounded if you prefer fluffier, cakey cookies. Bake for 10-15 minutes or until cookies start to brown.
Cool on wire racks for 5 minutes before enjoying with a mug of piping hot tea or a tall glass of ice cold milk!
Friday, November 2, 2007
Autumn is here...
I adore cinnamon! There's just something about the way it can make almost anything from cookies to oatmeal taste, smell and look better. I also associate it with autumn, my ultimate favorite season. The earthiness of cinnamon simply embodies the cool, calm comfort of fall days and it inspired to bake the ultimate cinnamon cookie: the snickerdoodle! In retrospect, part of the reason I baked snickerdoodles was that "snickerdoodle" is such a fun word to say. Haha!
Anyhoo, the snickerdoodle is a simple sugar cookie that has been coated with cinnamon sugar. It normally has a crackly appearance and variations include the use of nutmeg, raisins, or nuts. The recipe for snickerdoodles is also rather unusual for cookies because it uses a leavening agent, usually cream of tartar, which is not used in the average cookie. Another reason I decided to make these is that I've never had a snickerdoodle before! I thought a batch of these cookies would be a great autumnal treat for another autumnal rite of passage: the Halloween party (which will be a different post altogether).
As with any cookie recipe, this starts with the creaming of the fat (shortening, in this case) with the sugar, before the sifted dry ingredients (flour, baking soda, cream of tartar and salt) are stirred in until just mixed. One of the things one should never EVER do with cookie dough is to overmix it. This usually results in frustratingly tough cookies instead of the desired chewy yet slightly crisp texture that I personally love. The dough is the rolled into walnut-sized spheres before they're dipped into the sugar/cinnamon mixture before they're baked.
The cookies were delicious, crumbly and simply melted in my mouth when eaten fresh. I brought the rest of the cookies to a friend's Halloween party the next day. Although they weren't as good the next day, they were still delicious and the flavor wasn't lacking at all. So try out a snickerdoodle (if you haven't already) for the perfect fall treat with a tall glass of ice cold milk!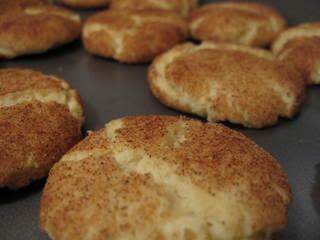
Recipe for Snickerdoodles
Ingredients:
1 cup trans fat-free shorteneing
1 1/2 cup white sugar
2 eggs, lightly beaten
2 3/4 cups AP flour (can substitute some with whole-wheat)
1 teasp. baking soda
2 teasps. cream of tartar
1/2 teasp. salt
2 Tbsp. white sugar
2 teasps. ground cinnamon
Preheat oven to 375 deg. F.
Cream the shortening with 1 1/2 cup sugar until smooth. Stir in the eggs.
Sift together the flour, baking soda, cream of tartar and salt. Stir the flour mixture into the creamed shortening/sugar mixture.
Stir together the 2 Tbsp. sugar and cinammon in small bowl.
Roll cookie dough into walnut-sized balls before rolling it in the cinnamon sugar mixture. Place the sugared cookie dough on a baking sheet, about 2 inches apart.
Bake 8-10 minutes or until edges are browned. Do not overbake unless you like snappy cookies.
Enjoy!
Wednesday, October 17, 2007
(Slightly) Devilish Angel Food Cake
A friend recently experienced a health episode that severely limits his fat intake. It doesn't sound that bad because most of us can and really should do that anyway, for health reasons. Being a bit of a chocaholic, it has been difficult for him to find a chocolate dessert that he can enjoy without giving him stomach pain. In order to help him out a bit and as a great excuse to bake, I made chocolate angel food cake!
I've made plain angel food cake before and it was perfect with a dollop of cream and fresh strawberries. However, I remember thinking that it was quite plain so adding some chocolate flavor to it will be quite awesome, no? Comprising of mostly egg whites, sugar and flour, angel food cake is a relatively healthy dessert. To make it, you start by beating 12 egg whites with sugar until it is stiff before folding in the other dry ingredients. It also takes quite a long time to bake: 60 whole minutes, but it is so worth it!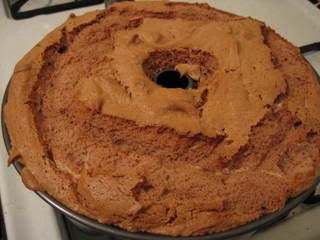
My chocolate angel food cake turned out beautifully moist and had this crackly, crisp crust on the top that was so addictive! I wonder if I can bake angel food cake in a sheet pan instead so that there would be more of the crackly crisp crust? Have any of you done that before?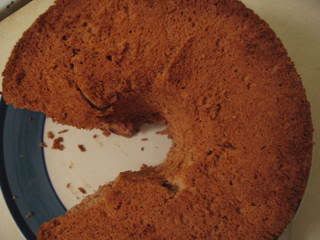
Recipe for Chocolate Angel Food Cake
Ingredients:
12 egg whites
1/4 teasp. salt
1 1/4 teasp. cream of tartar
1 1/4 cups granulated sugar
1 1/4 confectioner's sugar
1 1/4 cups cake flour
1/4 cup unsweetened cocoa powder
1 teasp. vanilla extract
First, preheat your oven to 325 deg. F.
Mix the confectioner's sugar, cake flour and cocoa powder. Sift this dry mixture at least once.
In a large clean bowl, whip egg whites with salt and cream of tartar until slightly stiff. Continue to beat while adding granulated sugar 2 tablespoons at a time until egg whites are very stiff.
Fold in the flour/sugar/cocoa mixture until just incorporated.
Mix in the vanilla.
Bake for 60 minutes or until cake springs back when touched.
Bon appetit!


