As you may have known already, I approach Christmas with mixed feelings. I despise the over-the-top commercial feel that the season now has but I love that it is the time of the year that everyone (and I mean, everyone!) tries to be kind. Growing up in Indonesia, my family never celebrated Christmas. We usually had a Christmas tree in the house though. Kinda weird, isn't it? Raised in a Muslim country, with Chinese parents and educated in a Catholic convent, it's little wonder that I'm confused! :)
It's unfortunate that I'm stuck in Chicago for the holidays, with my family so far away. I'm quite jealous of my friends who are going home to be with their families. If only my family didn't live so far away... Also, I'm going in to the lab this weekend, on Christmas Eve and day. I know, I know, pathetic, I know.
Fortunately, I have this month's Daring Bakers' challenge to console me: the Yule log or the buche de Noel. As you may know already, it is a traditional Christmas dessert in France and Quebec. According to Wikipedia, Napoleon ordered Parisians to keep their chimneys closed during winter due to the belief that exposure to cold air causes health problems. This perevented Parisians from using the fireplace and engaging in traditions involving the hearth. Supposedly, French bakers invented this sweet log-shaped dessert as a symbolic replacement around which families can gather and continue their traditions.
I have actually made a chocolate buche de Noel for a friend's Christmas gathering a few years back. It was super rich, chocolatey and decadent. Anyway, I just remember really liking it! Ivonne and Lisa are kindly hosting this month's challenge and the besides the basic genoise, dark buttercream (one strict rule is that it has to be dark!) and mushroom decorations, we're free to go crazy! Yippee!
The sources of the recipe are from Perfect Cakes by Nick Malgieri and The Williams-Sonoma Collection: Dessert.
Unlike the previous 3 DB challenges I've made, I managed to fudge this one up real bad. And I mean, pretty badly. I had to make each component of the yule log twice! Yes, the genoise, buttercream and meringues. Twice! Fortunately, they improved the second time I made them otherwise, I would've totally given up! The genoise cake recipe seems simple enough with the usual ingredients such as eggs, sugar, flour and cornstarch. The first time around, I spread the batter too thinly and baked it for too long. As you can see below, the sides were browned.
As a matter of fact, the cake nearer to the sides was baked to a crisp. I only made 2/3 of the genoise recipe and I think I might've spread it too thinly on the jelly roll pan. Big mistake! The second time around, I made followed the recipe as is and baked it for only 10 minutes. I also let the batter expand even more in volume before adding the flour mixture. Even though it looked allright, the genoise was a tad dry for my taste. I added a splash of vanilla extract into the batter, which made it very fragrant, but other than that, it's rather bland.
I decided to try out a luscious-looking raspberry jam I bought from the local grocery store as the filling. I mean, check out the label! It says "More Fruit than Regular Preserves". Now, who doesn't want that? Talk about raspberry, I miss summer already not because of the heat (oh, I hate summer heat and humodity!) but because of berries, which are my absolute favorite things in the world! So anyway, after spreading the filling oh-so carefully on the genoise, it's time to roll!
Unlike the thin, elegant yule logs I made previously and that I've seen on TV and in magazines, I decided to do something different (and a little crazy. Well, maybe a lot crazy). I though it would be interesting to make a thick log. I guess looking at my creation now, it's more like a stump than a log. Haha! To do so, I cut the genoise into 4 strips length-wise. 
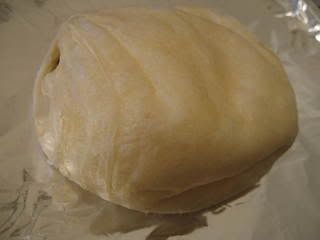
Rolling the genoise was a tad tricky but I manages to not ruin it, fortunately. The first strip was rolled into a tight cylinder. The next strip of cake was then just rolled around the first cylinder of genoise and so on, until all the cake is used up. Check it out!
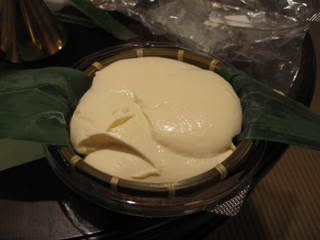
Next, comes the buttercream. The recipe supplied was for a coffee buttercream. I personally have an aversion to coffee. I also don't like coffee flavored stuff (with the exception of coffee ice cream), so I decided to go with a chocolate buttercream. My first attempt was pure nightmare, with the buttercream curdling and looking totally gross. After realizing that the meringue has to be totally cooled and that the butter has to be at room temperature, the second try went smoothly.
I had the most fun with the meringue mushrooms and other decorations. I simply adore meringue. They're light, fluffy and never fails to please the palate. I wanted to try out something that I saw on the Food Network show, Sugar Rush. In the special holiday episode, host Warren Brown visited the DC restaurant Citronelle, and learned from chef Michel Richard who to fashion snowmen out of fluffy meringue. In addition, he stuffed the snowmen with ice cream. How decadent is that? Unfortunately, I somehow burned my meringues the first time I made them and by the time I had to make the meringues a second time around, I was quite discouraged and decided to just make simple meringue shrooms :)
Even though I didn't have the gumption to make the ice cream-filled meringue today, it's something I will definitely try out in the future. As a matter of fact, I got ahead of myself today and purchased the ice cream I was planning on stuffing the meringue with. Check it out! 
Creme brulee ice cream by Ben & Jerry! I've never really been a big fan on B&J mostly because I think their toppings can get too damn chunky! So chunky that I can't fully enjoy the actual ice cream. I suppose that might be the whole point of B&J ice cream but I actually like the frozen cream part better than the toppings. I'm a purist, I know. But this creme brulee ice cream isn't as chunky as the typical B&J creation. It has a nice amount of swirls of caramelized sugar and a super rich custardy ice cream.
So, this DB challenge didn't go as well as I expected. I probably wouldn't make a buche de Noel using this recipe again. But thanks to this challenge, I've uncovered a new addiction: meringue! I loved the meringues so much that I ate about half of them! Not good, I know. I'm kind of expecting a stomachache soon, but they are sooo good!!! I suppose it's not too bad of an addiction, considering I need to lose a few pounds. After all, meringues are low in fat and high in protein! Anyway, I hope all of you have a Merry Christmas and a Happy New Year! Please check out my uber talented fellow Daring Bakers' creations here!
Saturday, December 22, 2007
Christmastime is here...
Tuesday, December 18, 2007
Can you say "Chocolate"?
It is the stuff made of legends, this thing they call "La Bete Noire". Its literal translation is "the black beast" and a black beast it is. In the English language, the phrase can also refer to something one dreads or hates. Not only has there been a movie of that name, there has also been a comic book of the same title.
But among us cooks, bakers and chocoholics, it is simply (or not so simply) the flourless chocolate cake, the ultimate dose of pure chocolate. La Bete Noire first captivated my imagination when it occupied the cover of the September 2006 issue of Bon Appetit magazine. I've heard planty of this mythical creation; so rich, velvety and yet so deadly. I've always wanted to try out the recipe, but there never seemed to be enough time or the appropriate occasion for such a monumental dose of chocolate.
Finally, a lab friend's birthday on Tuesday has offered the perfect excuse. La Bete Noire was simple enough to make. Although it only has merely 5 staple ingredients, I must warn you that this cake is not for the faint of heart (or gut!), for this creation has a little more than 1.5 pounds of chocolate, half a dozen of eggs and a stick of butter in it!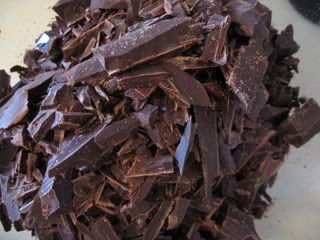
The cake was super dense and had a nice, thick, fudge-like texture that softens up if left at room temperature. I agree with some reviewers of the recipe of Bon Appetit's website, that serving it with whipped cream would "lighten" it somewhat, ironically. However, I served it with some luscious raspberries and it was pretty awesome.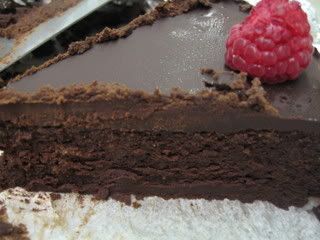
Upon the first bite, you wouldn't know what hit you. Seriously, this super chocolatey cake would knock your socks off! It is the perfect dessert for a chocoholic and it would definitely blow your guests away at the holiday table. A slice of this black beast is enough to assuage my chocolate addiction for the week. Yes! Seriously, it's THAT chocolatey.
Would I make it again? Probably, some time in the future. This cake was a cinch to make and turned out delicious. I would totally recommend this for your holiday table, especially if you're a chocolate-lover!
Friday, December 14, 2007
Bah, humbug!
I'm in a funky mood thesedays. Despite being barraged by a constant cacophony of Christmas-y messages, I don't feel particularly merry. I suspect it's the combination of experiments not working in the lab, being single and having my family sooo far away during this season that celebrates together-ness. To counteract this negative energy, I decided to try to get into the holiday mood by writing up Christmas cards and baking some homemade gifts.
I recently saw an entry on Jenjen's blog about Martha Stewart's double chocolate cookies and was salivating at the sight of those decadent goodies. And what better way to get into the holiday mood than baking some cookies for friends? Although it's a simple recipe, I managed to fudge it up a bit by not reading it completely before starting to whip the butter with the sugar. After whipping, I noticed that the consistency of the butter-sugar mixture didn't look right. Upon re-reading of the recipe, I realized that I had to melt the butter with the bittersweet chocolate before mixing in the sugar. Fortunately, I didn't have to start from scratch and the batter turned out ok even if I just added the melted bittersweet chocolate into the whipped butter-sugar mixture.
Lesson to be learned: Read the whole recipe from start to finish before starting! You'd think that I would know to do this after some years of baking. Tsk, tsk!
I love that Jenjen also added bittersweet chocolate in addition to the milk chocolate, thus yielding a richer, more chocolatey cookie that isn't as cloyingly sweet as it might've been. As usual, I underbaked the cookies slightly, giving it a chewy texture with an ever-so-slightly-crisp outside that I enjoy. 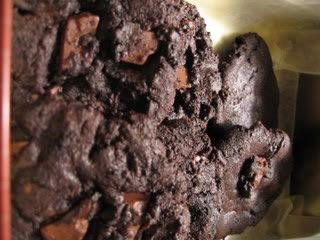
These cookies were so awesome that if I hadn't had the willpower to pack most of them in tins to be mailed to my friends, I would've consumed all of them within the next few days, which wouldn't have been good. The recipe is perfect as it is and doesn't need any adjustments, except maybe, changing the type of chocolate chips that you might enjoy more, eg. white chocolate chips or butterscotch, etc.
I must say that nothing gets you in a holiday season faster than cookies and milk!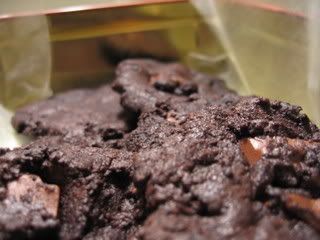
Tuesday, December 11, 2007
I Love Mitsuwa!
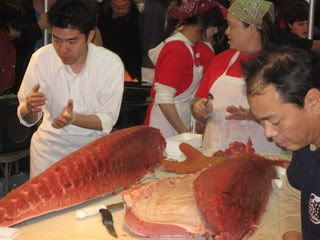
Mitsuwa is a Japanese grocery chain in the US that I've been patronizing over the last few years. Besides groceries, the Mitsuwa in the Chicago suburb, Arlington Heights, has a food court comprising of numerous Japanese, Chinese and Korean vendors selling cheap and fresh hot food. They have recently added a tea house-style vendor who also sells ice cream. My last excursion there was particualrly eventful because they had a tuna carving performance that afternoon, which I knew of in advance. Mitsuwa flew in a fresh, never-frozen, 500-lb tuna from the coast of Spain to be carved in front of their patrons. Being a sushi-phile, I planned for weeks in advance to journey 30 miles (and back) in order to procure fresh tuna. Specifically, I wanted o-toro, the desired super fatty stomach of the tuna!
Despite the promise of horrid weather, I was able to convince a dear friend to come along with me. And boy, was I glad that we went! The tuna was absolutely beautiful, with its dark-colored flesh and yummy-looking marbling. The fish may not look impressive in these pictures, but keep in mind that it was already gutted and beheaded. Remember that this is all pure meat!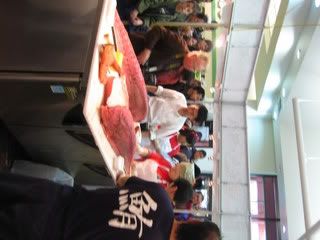
Even though I already had lunch (unagi from the food court), the sight of fresh o-toro made me hungry all over again. 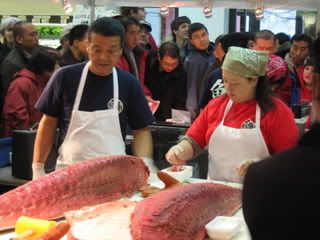
I was able to purchase about $15 worth of pure o-toro, which is considerably cheaper than what I would'be probably paid at a sushi restaurant. The "chef" was kind enough to slice them into sashimi for me and I had it with a sprinkling of soy sauce for dinenr at home. I was simply amazed at the richness and the purity of the flavor. I had never seen such extensive marbling of o-toro and this was definitely the richest o-toro I've had by far. At $15, this kind of deal is definitely not to be missed if it ever came to town again :)
My friend got a piece of the "chuck" tuna, which was also delicious. We coated it with roasted white sesame seeds and seared it on a pan. It was served with lettuce, tomato, some mayo on toasted shokupan. The sandwich was simply heaven on a plate!
As if all this fishy decandence wasn't enough, I also had dessert from the new stand in the Mitsuwa food court, Re Leaf. I had their special, which was the Matcha parfait, a layered concoction served in a clear, tall plastic cuo. It starts with matcha jelly at the bottom, a scoop of vanilla ice cream, red bean paste, some pie crust-like cookie chunks, mochi balls, more red bean, matcha soft-serve ice cream and a thin slice of buttery cookie.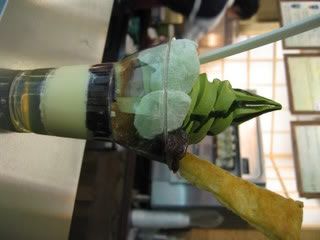
The pastries that they added were total misses. The parfait would've been way better without the pie crust-like cookies and the slice of cookie that they topped it with. Other than that, I absolutely loved it! The presentation was very pretty and the combination of jelly, mochi, red bean and matcha soft serve made me think of similar dessert creations that I had while travelling in Japan. The flavors were very strong and authentic. In combination, they marry very well together. If you're in the Arlingto Heights area, don't miss Mitsuwa. That place is an absolute treat and I always leave happy!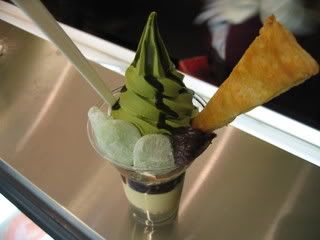
Sunday, December 9, 2007
Alice Waters' apple tart
Despite not having had the privilege to dine at Alice Waters' ground-breaking restaurant in Berkeley, recipes for her famous apple tart has been circulating both on the internet and in numerous magazines for some time now. I was inspired by a post on Smitten Kitchen, and made the apple tart for Thanksgiving dessert.
The recipe is simple and very straightforward. I took the liberty to arrange the apple slices in concentric rings, to create a flower-like appearance. The crust turned out perfectly crisp, which made me imagine that I was eating apple pizza. Served with a scoop (or two) of light vanilla ice cream, it was the perfect ending to a decadent Thanksgiving meal.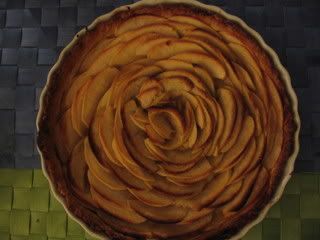
Monday, November 26, 2007
Po-tay-toh, po-taaah-toh bread dough goodness!
I enjoy baking with yeast and lament the fact that I don't get to do it enough. So I'm super duper happy that November's Daring Bakers challenge is the Potato Bread. Thanks to this month's host, Tanna, I got to play around with yeasty dough! Yippee!
Thus far in my 4-month-old membership to this wonderful group of bakers, I think the potato bread challenge is the one that allows our creative juices to flow the most. This is because not only can we make potato bread, we can use the dough for many other purposes, as long as it's savory. In other words, Tanna encouraged us to go crazy, which is awesome! Haha!
Adapted from Jeffrey Alford and Naomi Duguid's book, Home Baking: The Artful Mix of Flour & Tradition Around the World suggestions for the use of the potato dough are bread, rolls and foccacia. I decided to make foccacia and bread.
Due to the large variation of amount of potatoes and flour that could be used (with less potatoes being recommended for beginners), I used the the least recommended amount of potatoes and added approximately the lower range amount of flour. This resulted in an super sticky dough that was quite difficult to handle. Nevertheless, I managed to use a third of the dough for a foccacia, which I baked in a jelly roll pan that has been greased with olive oil. Now, I didn't go as crazy as I wanted to with the foccacia topping only because I was limited with ingredient availability and it was too damn cold to go out and get some. I ended up sprinkling my beautiful foccacia with rosemary, salt, caramelized onions and pine nuts. Here's what it looks like before I put it in the oven.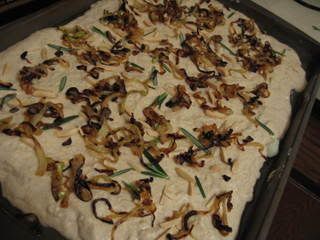
And this is what it looked like once baked.
The foccacia turned out to be soft and pillowy with a moist crust. It was a very delicious dough! The toppings were quite good too, although maybe I should've toasted the nuts and NOT caramelize the onions. Baking the caramelized onions made them a bit burned and I'm sure I overconsumed those yummy carcinogenic bits of onion. I enjoyed the foccacia with a teriyaki chicken breast salad. They made wonderful partners for dinner :)
The potato bread was a bit of a disaster for me. Once the dough rose, the top layer got stuck to the plastic wrap that I used to cover it while proofing. And then, I realized only after the bread was done, that I forgot to slash the top of the bread. So my bread turned out rather crappy. It didn't even rise beautifully in the oven. Boohoo!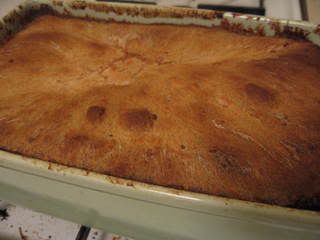
Overall, I enjoyed baking with yeast, though I wish my potato bread didn't turn out to be such a bomb! In retrospect, I added way too little flour. I suppose getting a potato bread dough of good consistency will take some trial and error. But I was really happy with the way the foccacia turned out. It was an awesome challenge and now I challenge you to check out the other DBers' creations here! Let me just warn you that your stomach might start growling at the sight of their breads!
Friday, November 16, 2007
One special sistah!
Once upon a time, about 22 years ago on this day to be exact, a human being was born into this world. I met her for the first time on my parents' bed and I remember being amazed how anyone can exist in such a small body, peer through such teeny weeny eyes and grasp so tightly with such chubby, short fingers. She's my sister :)
I used the Indonesian slang word "gemas" to describe her. It doesn't have an exact English translation but it's along the line of "adorable", "huggable" and "scrumptious" at the same time. Don't worry, it didn't even cross my mind to eat her! Growing up, I remember her wanting to follow me and emulate me all the time. As any older sister can tell you, I found this immensely irritating in a cocky big sister way.
We spent a lot of our formative years apart. I started school in Singapore at the age of 7 while my parents and sister lived in Indonesia. She came to Singapore when she turned 11 and I left for college in Chicago a few years later. Despite the short time we had together, I had beautiful memories of growing up with my sister. We used to listen to Beethoven's Moonlight Sonata in our room while peering out the window, admiring the sunset. I also recall the fun we had organizing a surprise birthday party for our cousin.
It certainly helps to have a sibling who totally understands the unique, crazy family that surrounds us. A sibling is also useful sometimes to diffuse the nervous energy or attention that parents sometimes have for their children. I'm especially grateful that despite the physical distance between us most of the time, we have managed to grow up together. I'm also very happy that we've grown closer and closer over the years. I can't imagine having grown up without my sister and can only wonder how horrible life would be without her.
So when she said she wanted homemade oatmeal raisin cookies for her birthday, I immediately rolled up my sleeves and baked the best oatmeal raising cookies that I've ever baked. The secret ingredient? A little bit of honey and a whole lotta love! Haha! Corny, I know but true!
These cookies turned out to have crisp, thin outer layer while remaining chewy inside. They aren't excessively sweet and they're relatively good for you. Hey! Raisins contain a lot of antioxidants and oats are very fibrous! Try out the recipe below :)
So, I want to dedicate this post to the one I love: my dear little sister. I want to wish her a healthy, happy, wonderful year ahead. And I look forward to more years of growth (and gossip!) with her!
Recipe for the best Oatmeal Raisin Cookies ever!
Ingredients:
1 cup butter
1 1/4 cup packed brown sugar
2 eggs, lightly beaten
2 teasp. vanilla extract
1 Tbsp. honey
1 1/2 cup AP flour (can substitute up to half with whole wheat)
1 teasp. baking soda
1 teasp. ground cinnamon
3 cups rolled oats
1 cup raisins
Preheat oven to 350 deg. F.
Cream room temp. butter with brown sugar until smooth. Stir in eggs, vanilla extract and honey.
Sift flour, baking soda and cinnamon. Stir dry ingredients into creamed butter mixture 1/3 at a time. Stir in the oats and raisins until just incorporated.
Drop dough by the teaspoon onto cookie sheet. Flatten slightly with the back of spoon if you like flatter, crisp yet chewy cookies. You can leave the dough rounded if you prefer fluffier, cakey cookies. Bake for 10-15 minutes or until cookies start to brown.
Cool on wire racks for 5 minutes before enjoying with a mug of piping hot tea or a tall glass of ice cold milk!
Wednesday, November 14, 2007


Tuesday, November 13, 2007
Countdown to Thanksgiving!
You know Thanksgiving is around the corner when red and green-colored ads are popping left and right. Yes, isn't that sad? Fall has barely finished unfurling her blasts of reds, oranges and yellows and retailers are already out in full Christmas force. Sigh~ Just what on Earth is happening to this world?
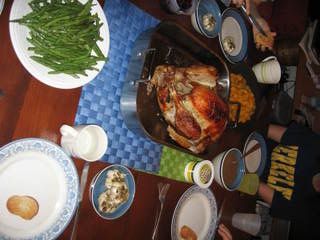
My cousins and I started a tradition of having a reunion on Thanksgiving about five years ago. Every year, we pick a different city to gather at, usually a city where one of us resides in. This year, they're going to be descending in good ol' Chicago for our reunion. It's going to be a ton of fun having my cousins around (one of them is going to bring his Nintendo Wii console. Wheee!). I'm going to be cooking my first Thanksgiving dinner ever, turkey and all! I'm more excited than nervous at this point in time. As a matter of fact, I've already had the menu planned out, the shopping list written out and some of the more durable ingredients in my fridge. Another reason it's good that my cousins are coming over is that it's a good catalyst to get me to clean my apartment!
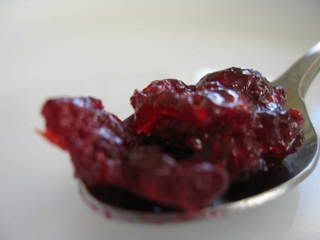
Since I'm going to be the primary organizer and cook for Thanksgiving, I'm going to try to do as much as I can in advance, which brings me to the recipe for this entry: orange-infused cranberry sauce. I encountered this incredibly simple recipe on this beautiful blog. All you need are cranberries, sugar, orange zest and juice. And all you gotta do is combine them and roast for 45 minutes! How much simpler can it get? And hey, it doesn't hurt that it's wonderfully tasty and so pretty to look at ;)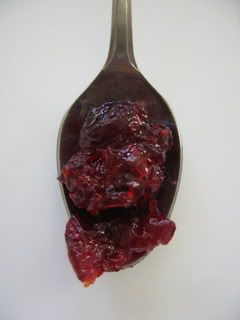
Sunday, November 4, 2007
A perfect Sunday morning breakfast is...
Sunday is my favorite day of the week. I find that it is the only weekend day when I can totally rest, wind down and really think of things that I don't have the time for during the work week. My favorite Sunday ritual?
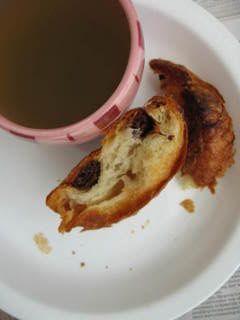
Poring over the Sunday paper with a pair of scissors by my side over a mug of perfectly brewed green tea and a simple breakfast. "Why the scissors?", you ask. I'm actually a closet coupon-lover! I'm one of those geeks who loves the bulky coupon section of the Sunday paper, haha! Anyhoo, yesterday morning, I had the perfect Sunday morning breakfast of a mug of green tea (as usual) and a warm, flaky chocolate croissant fresh out of the oven.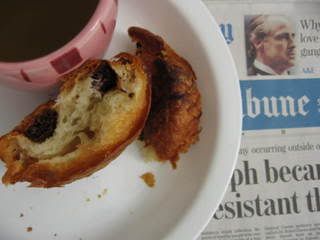
I certainly do not have the skills to make croissants myself! I know it's an extremely labor-intensive process and from what I hear about the amount of butter that is used in making them, I would rather not visually witness the ton of butter that goes into my croissant. I actually bought a pack of frozen chocolate croissants from Trader Joe's, one of my favorite grocery stores ever. EVER!
Before I rave about this awesome product, let me just clarify that I do NOT work at TJ's or even own their stock (though I believe it's a privately-held company, but if they were to go public, I'd actually get some of their IPOs, that's how much I love TJ's!). For the benefit of those of you who do not live near a TJ's, it is an awesome grocery store that is most famous for the quality and range of products that they sell under their own name. They carry a lot of natural, organic stuff and are very very reasonably-priced. They're probably most widely-known for their two-buck-chucks (or three bucks in Chicagoland), their own brand of white and red wines that are pretty damn good for a few bucks. So anyway, I decided to try out their frozen chocolate croissants during my sojourn to TJ's this past Saturday.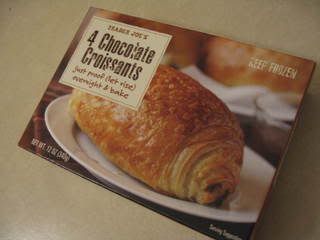
In order to enjoy these croissants, you have to plan in advance (like, one day ahead) because you have to take them out of the freezer and leave it at room temperature overnight (approximately 9 hours) so that they can rise (or proof, in bake-talk). Check out how big mine grew!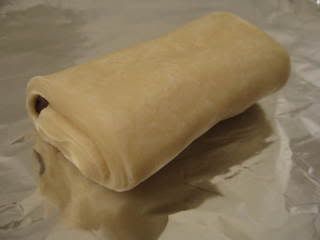
After it proofs, all you gotta do is put it in a 350 degree F oven for 20 minutes and you can enjoy a warm, buttery, decadent chocolate croissant. My verdict? It is pretty darn good, actually! It's very buttery and rich, though not as flaky as some great croissants that I've tasted before. However, it's also definitely better than some croissants I've had from some bakeries too! I will totally buy this again because not only are they delicious, they are also so cheap and so easy to make! Seriously, $1 a piece for warm, fresh-out-of-the-oven chocolate croissants? It doesn't get any better than that :)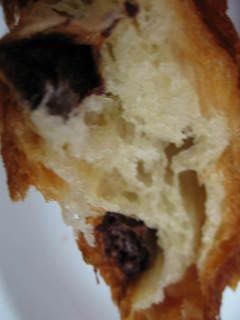
Friday, November 2, 2007
Autumn is here...
I adore cinnamon! There's just something about the way it can make almost anything from cookies to oatmeal taste, smell and look better. I also associate it with autumn, my ultimate favorite season. The earthiness of cinnamon simply embodies the cool, calm comfort of fall days and it inspired to bake the ultimate cinnamon cookie: the snickerdoodle! In retrospect, part of the reason I baked snickerdoodles was that "snickerdoodle" is such a fun word to say. Haha!
Anyhoo, the snickerdoodle is a simple sugar cookie that has been coated with cinnamon sugar. It normally has a crackly appearance and variations include the use of nutmeg, raisins, or nuts. The recipe for snickerdoodles is also rather unusual for cookies because it uses a leavening agent, usually cream of tartar, which is not used in the average cookie. Another reason I decided to make these is that I've never had a snickerdoodle before! I thought a batch of these cookies would be a great autumnal treat for another autumnal rite of passage: the Halloween party (which will be a different post altogether).
As with any cookie recipe, this starts with the creaming of the fat (shortening, in this case) with the sugar, before the sifted dry ingredients (flour, baking soda, cream of tartar and salt) are stirred in until just mixed. One of the things one should never EVER do with cookie dough is to overmix it. This usually results in frustratingly tough cookies instead of the desired chewy yet slightly crisp texture that I personally love. The dough is the rolled into walnut-sized spheres before they're dipped into the sugar/cinnamon mixture before they're baked.
The cookies were delicious, crumbly and simply melted in my mouth when eaten fresh. I brought the rest of the cookies to a friend's Halloween party the next day. Although they weren't as good the next day, they were still delicious and the flavor wasn't lacking at all. So try out a snickerdoodle (if you haven't already) for the perfect fall treat with a tall glass of ice cold milk!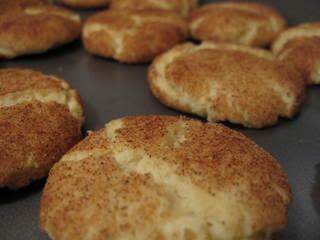
Recipe for Snickerdoodles
Ingredients:
1 cup trans fat-free shorteneing
1 1/2 cup white sugar
2 eggs, lightly beaten
2 3/4 cups AP flour (can substitute some with whole-wheat)
1 teasp. baking soda
2 teasps. cream of tartar
1/2 teasp. salt
2 Tbsp. white sugar
2 teasps. ground cinnamon
Preheat oven to 375 deg. F.
Cream the shortening with 1 1/2 cup sugar until smooth. Stir in the eggs.
Sift together the flour, baking soda, cream of tartar and salt. Stir the flour mixture into the creamed shortening/sugar mixture.
Stir together the 2 Tbsp. sugar and cinammon in small bowl.
Roll cookie dough into walnut-sized balls before rolling it in the cinnamon sugar mixture. Place the sugared cookie dough on a baking sheet, about 2 inches apart.
Bake 8-10 minutes or until edges are browned. Do not overbake unless you like snappy cookies.
Enjoy!
Monday, October 29, 2007
end of month in sight...
Usually, I'd be excitedly posting the monthly Daring Baker's challenge at this time of the month. Unfortunately, a recent existential/career crisis has catapulted my schedule into disarray, thus not allowing me to devote much time into my cooking/baking hobby (or really, anything else outside work). I'm kicking myself for missing this one out because it sounds like such a fun and delicious challenge, our Mary's Bostini Cream Pie! Sighs...
I guess all that I can do for now is to admire my fellow DBers' creations from afar and salivate over their pies. Check them out here!
Wednesday, October 17, 2007
(Slightly) Devilish Angel Food Cake
A friend recently experienced a health episode that severely limits his fat intake. It doesn't sound that bad because most of us can and really should do that anyway, for health reasons. Being a bit of a chocaholic, it has been difficult for him to find a chocolate dessert that he can enjoy without giving him stomach pain. In order to help him out a bit and as a great excuse to bake, I made chocolate angel food cake!
I've made plain angel food cake before and it was perfect with a dollop of cream and fresh strawberries. However, I remember thinking that it was quite plain so adding some chocolate flavor to it will be quite awesome, no? Comprising of mostly egg whites, sugar and flour, angel food cake is a relatively healthy dessert. To make it, you start by beating 12 egg whites with sugar until it is stiff before folding in the other dry ingredients. It also takes quite a long time to bake: 60 whole minutes, but it is so worth it!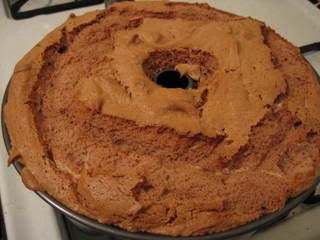
My chocolate angel food cake turned out beautifully moist and had this crackly, crisp crust on the top that was so addictive! I wonder if I can bake angel food cake in a sheet pan instead so that there would be more of the crackly crisp crust? Have any of you done that before?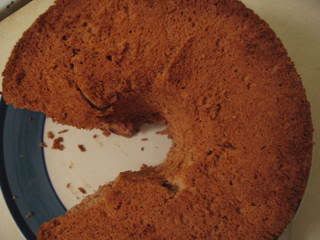
Recipe for Chocolate Angel Food Cake
Ingredients:
12 egg whites
1/4 teasp. salt
1 1/4 teasp. cream of tartar
1 1/4 cups granulated sugar
1 1/4 confectioner's sugar
1 1/4 cups cake flour
1/4 cup unsweetened cocoa powder
1 teasp. vanilla extract
First, preheat your oven to 325 deg. F.
Mix the confectioner's sugar, cake flour and cocoa powder. Sift this dry mixture at least once.
In a large clean bowl, whip egg whites with salt and cream of tartar until slightly stiff. Continue to beat while adding granulated sugar 2 tablespoons at a time until egg whites are very stiff.
Fold in the flour/sugar/cocoa mixture until just incorporated.
Mix in the vanilla.
Bake for 60 minutes or until cake springs back when touched.
Bon appetit!
Monday, October 15, 2007
Brownie trio: PB, hazelnuts and plain Jane...
A friend hosted a totally awesome party this past weekend, where she made scrumptious pork-filled Filipino spring rolls among other things. It was a fun-filled event with a lot of horsing around the karaoke Magic mike, the Nintendo Wii console and hangin' out. I decided that any great par-tay needs chocolate, so I contributed a trio of brownies. As usual, I got the basic recipe from Allrecipes. I've tried the brownie recipe once before and it was immensely popular among my friends, so I used the same recipe again with slight modifications.
To make the trio brownies, I followed the recipe for the brownie batter. The modifications I made were only to the topping/filling. One-third of the brownie got a drizzling of creamy peanut butter on top before baking; the second third had chopped hazelnuts in the bottom and top of the batter; and the last third is plain jane!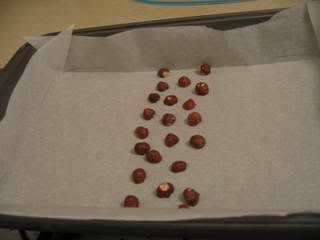
The brownies baked up beautifully and I left it in the oven for the lower range of baking time. I find that for cookies and brownies (especially brownies!), underbaking tends to yield better-textured goodies than overbaking. It gives the baked goods an ooeey-gooeeyer mouth feel that most people enjoy. Then again, there are some who prefer drier, snappier cookies but hey, to each his own, right?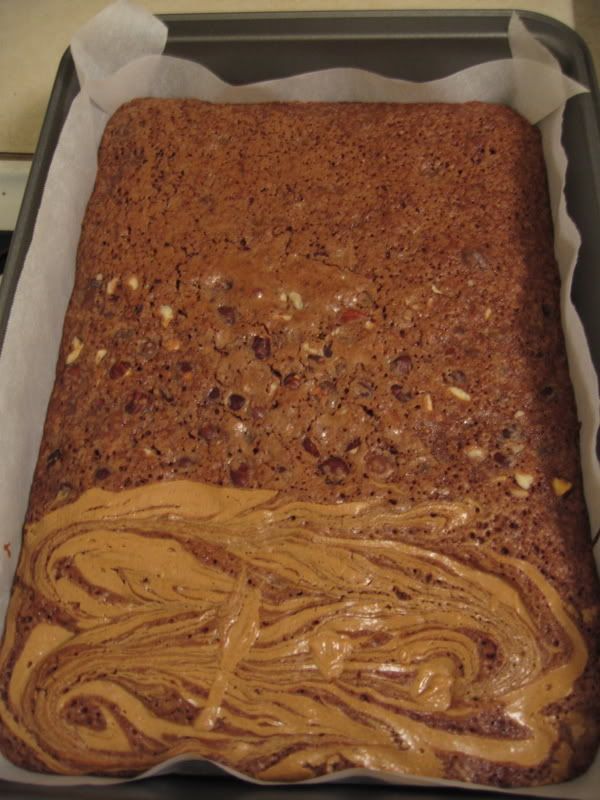
For easy snacking during the party, I cut up the brownie trio to individual bite-size portions. Here's a shout out to Mark and Frances, the host and hostess with the mostest, for an uber-fun party, giving me an excuse to bake up this yummy brownie trio!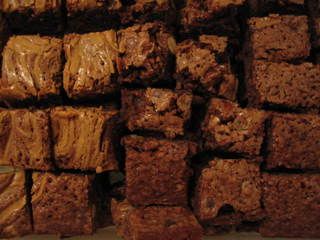
Monday, October 8, 2007
Tofu snack bites
Living by myself is both enjoyable and somewhat precarious at the same time. I love that I answer to no one at all and that I can play any kind of music or watch any kind of TV program that I want without anyone piping in. Now, in theory, this also translates to my ability to cook/make/eat whatever I want. This is true, but it hasn't really happened to me. As a matter of fact, I used to cook/bake/eat a lot better when I had roommates! I feel that when I actually had other people to feed, I applied myself to actually planning a wholesome menu and making a nice meal. Now that I'm living solo, I feel like I don't have to make a special effort to make something nice to eat when it's just for me alone (especially after a hard day's work). The other contributing factor is the reality that food just doesn't taste or smell or look that good when it's enjoyed alone as opposed to when it's enjoyed with loved ones.
So anyway, a girl still has to eat, right? Thesedays, I've resorted to eating more conveniently. And no! I haven't been living off frozen TV dinners or disgusting canned veggies, thank the Lord! Instead, I have been eating convenient fresh things, like baby carrots and celery dipped in store-bought hummus (which seems to always be on sale when I'm shopping, yay!). Other indulgences include crunchy peanut butter and nutella, both of which I just eat by themselves, on a spoon. Indulgent, I know. Eating mostly veggies and chocolate spread is fine for the most part but my body needs more than that, especially since I started running on a regular basis.
I find meat to be a chore, what with living alone and stuff, so I've started eating a lot of tofu! Yep, yep, that good ol' delicious soybean curd. Prior to recent times, I haven't prepared tofu too much because it is rather unfamiliar grounds for me and I've never particularly found Asian-style tofu dishes too healthy. My recent trip to Japan changed that misperception. In Tokyo, there are many many types of tofu available, ranging from silky smooth to chunky and chewy. They also come in many flavors, my favorite being a sesame-infused chewy tofu served in a shallow pool of scrumptious soy sauce that we had at a shabu-shabu restaurant.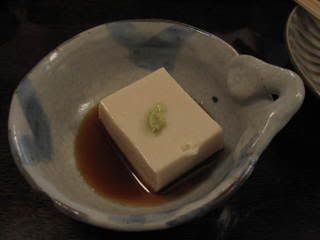
I also bought a little basket of fresh, plain, silky tofu from a merchant at Matsuzakaya in Ginza. Enjoyed only with soy sauce, it was a simple, clean and healthy treat. The packaging might have been a little elaborate, what with the leaf wrapping and basket nest, but the flavor is simple and unadorned, the way good tofu should be eaten.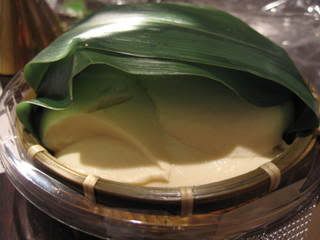
The types of tofu one can get in the US is rather subpar compared to the delicacies in Japan (which is to be expected, as after all, Japan is like, the tofu capital of the world, in my opinion). I don't think the tofus found here can be enjoyed plain by itself. So anyway, I've been hunting for easy, delicious tofu recipes and to my surprise, even a generic recipe website such as Allrecipes has a few wonderful-looking options. So this past week, I tried the recipe for Baked Tofu Bites. I was immediately sold when I saw that one of the ingredients is sesame seeds *haha* Some components of the recipe sounds a bit weird, such as the addition of liquid smoke. Ew! In accordance with some of the other reviewers suggestions, I left that part out. I also did a lot of improvisation because I didn't have some of the main ingredients, such as ketchup, maple syrup and vinegar. Instead, I used the same amount of jarred pasta sauce, sugar and left out the tangy/sour component of the vinegar.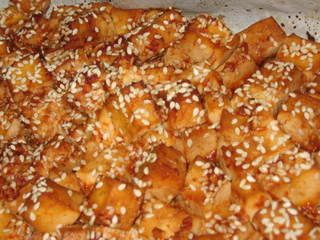
Despite the multiple, rather un-kosher substitutions, the tofu bites turned out great! I expected them to be a bit crunchy but that might be because I piled the tofu cubes onto the baking sheet instead of spreading them out in a single, neat layer. I will definitely try to do this next time. They were delicious and flavorful and great as leftovers! Some future changes I might make to this recipe include using black sesame seeds in addition (or maybe, instead of) the white ones, adding a dash of sesame oil. Yeah, yeah, I'm a total sesame nut! Anyhoo, if you're delving into the adventurous world of tofu, this recipe is a perfect start: simple and delicious!
Sunday, September 30, 2007
These bunz will go right onto your bunz!!!
It's true! They are oh-so good but oh-so bad at the same time. But really, who cares as long as they taste good, no? *winks* Anyway, it's that time of the month again: the DB challenge! And again my fellow baking soul mates have yet come up with another unbeatable crowd favorite: cinnamon buns and/or sticky buns. We have our Pip in the City, the lovely Marce to thank for this awesome selection. The recipe we used is the one from Peter Reinhart's The Bread Baker's Apprentice. Since I'm not a huuuge fan of sticky buns, I chose to make cinnabunz only.
I associate cinnabunz with warm childhood memories. I remember having my first cinnabun some time when I was in my teens, while vacationing in America with my aunt's wacky family. At the time, I was living in Singapore and found every facet of American culture (including food, of course) supremely fascinating. My first cinnabun seemed to me a warmly luxurious and luscious , even though it was just a snack we bought at the shopping mall we were in. I distinctly remember the cinnamon-y fragrance just wafting into my olfactory neurons and the pillowy concentric dough melting in my mouth, transporting me to the realms of cinnabun heaven, albeit for a few minutes only. So I was uber excited about this month's DB challenge!
This isn't my first time baking with yeast, so I wasn't too nervous. I have made some yeast-based goodies before here and here, but never cinnabunz. I thought making cinnabunz would be pretty complicated, what with the pretty swirly shape and getting the pillowy texture right. I ended up making it twice because the first time round, I overbaked my buns despite only baking them for minimal time. The second time, I decided to crowd the buns a little bit more before baking and the buns' mouth feel turned out to be closer to the desired cinnabunny, chewy and pillowy texture!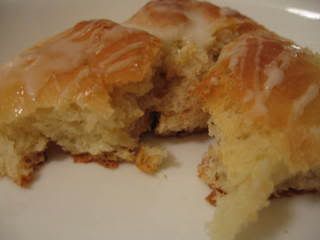
Contrary to my expectation of cinnabunz being hard to make, it was pretty simple (especially if you have a Kitchenaid mixer, which I must say is a dream machine for all bakers!). The only adjustment to the recipe that I made was instead of using only cinnamon for the cinnamon sugar, I used a teeny bit more pumpkin pie spice, which basically comprises of a combo of cinnamon, ginger, cardamom, allspice and nutmeg for extra spice! Besides spacing the buns correctly and slightly underbaking them for the right duration, the most challenging part of the recipe was the rolling of the dough! It was quite difficult to roll the dough tightly so that the concentric swirls aren't too far apart. Fortunately, despite the lack of talent in the dough rolling department, the bunz didn't turn out grotesque or anything!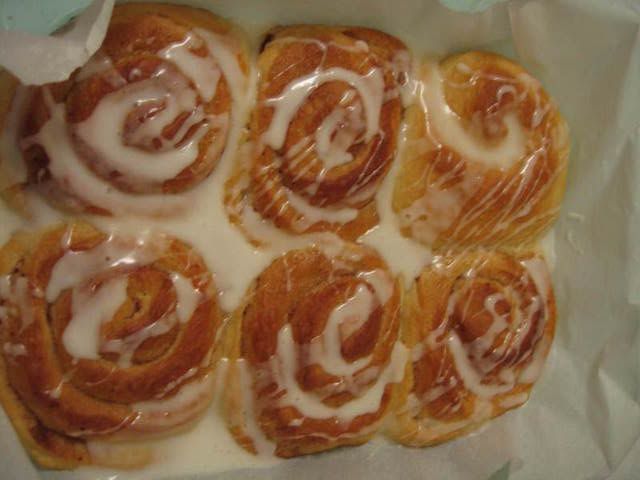
Baking with yeast never fails to give me a sense of earthy satisfaction and accomplishment. I remember the first time I used yeast, I underestimated the temperature and ended up killing my poor Saccharomyces cerevisiae (geek talk for yeast). The maiden bread was a heavy, brick-like thing that was reminiscent of a brick. Since then, thankfully, I've become more adept at not killing the dynamic baking ingredient.
Points of improvement for the future includes possibly rolling the dough thinner so that the circular concentric layers aren't as thick and underbaking them even more. It's pretty cool to have made something that seems to difficult. My lab mates (who I share all my baked goodies with) are all amazed that someone (or really, anyone) makes cinnabuns from scratch at home. And as usual, it's a great joy to be able to share my passion (or at least, the results of it) with people around me! Do check out my fellow baking soul mates' efforts here. They're pretty darn awesome!
Sunday, September 23, 2007
It's war!!!
The war of the frozen treats has descended on New York City this summer. Not only has Pinkberry entered the premium frozen yogurt (or fro yo as they like to call it in good ol' California) market in the East Coast, the Italian gelateria, Grom, opened their inaugural American store smack dab in Manhattan. This is all pretty awesome because as some of you already know, I am simply addicted to frozen treats, be it ice cream, gelato, or even tofuti! Yes, I eat "tofu ice cream" and they're so good!
So I spent a weekend with the family about two weeks ago in NYC. My parents happened to be there because they were visiting my sis in NYC to help her settle down with her new school. Since my family's there, I might as well join the fun, no? But anyway, my pop and I managed to snag some US Open tickets too, on Ebay for this past weekend, so it was even more awesome!
OK, before I get into the US Open, let's re-prioritize and get back to frozen treats! I was lucky enough to have tried out most of the frozen treat shops (except for the much-touted Grom) but there's always next time. I've heard and read a lot about the California house of fro yo, Pinkberry. Not only has their treats been endorsed by multiple celebrity sightings in those mindless glossy magazines, I've read about them in many other foodie blogs too. They're also thinking of setting up shop right here in Chicago, which is so awesome because another frozen treat option never hurts anyone. So anyway, Pinkberry entered the NYC market pretty aggressively, opening 4 shops just this summer alone. They only offer two flavors: the original (which is a bit tangy) and green tea (which I've never tried). Their specialty is the wide range of their toppings, from the more "mundane" such as Oreo bits, slivered almonds to the more unusual such as mini mochi (rice flour balls) and fresh fruits. My mum, who's an ice cream addict like me, absolutely adores this frozen treat option because she's also a health nut. So Pinkberry lets her indulge her frozen treat craving without the guilt. I topped mine with slivered almonds, chopped strawberries and blackberries. I found that the Pinkberry topping to fro yo ratio was scant and wish that they would've given us more berries and nuts. My sister said that it pretty much depends on the crowd in the shop at the time. She finds that they tend to be more generous when it's less crowded. I guess we caught them in their grumpy time...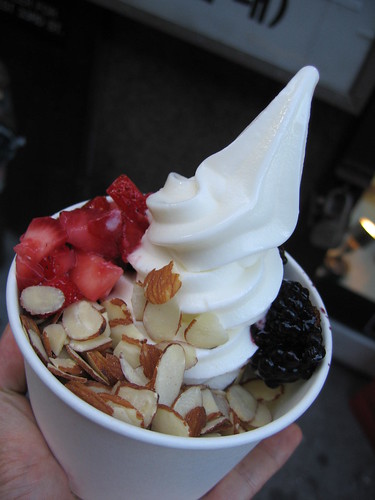
About a block away from Pinkberry's 32nd Street branch is another fro yo shop called Crazy Bananas. They're less publicized but I got wind of them, thanks to fellow food blogger Robyn. Besides a bunch phallic banana-ish decor items (which I was too embarassed to document with my camera because my folks were with me), their offering is very similar to Pinkberry's: fro yo with awesome toppings. Also, Crazy Bananas only offer the original yogurt flavor, no green tea. Other items on the menu include tea and smoothies. Due to less publicity, there were no lines at Crazy Bananas. As a matter of fact, we were the only customers in the shop when we made our pilgrimage there. I must say that I prefer Crazy Bananas to Pinkberry for a few reasons. First, it's waaay less crowded than Pinkberry. Not only were the lines super long at Pinkberry, it was virtually impossible to get seats there. And second, due to the lack of a crowd, the proprietor was extremely generous with the toppings. Just check out the mile-high pile of mochi balls and Oreos, slivered almonds, beautiful kiwi and luscious whole berries below!!! Also, it doesn't hurt that Crazy Bananas is slightly cheaper.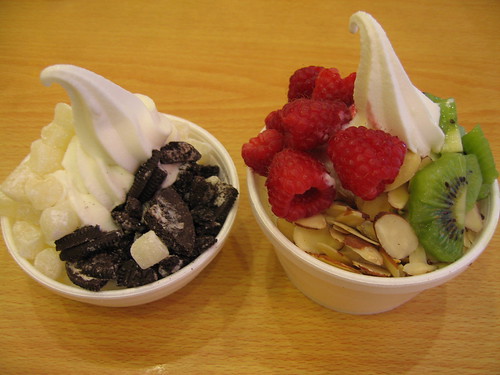
Another participant in this frozen treats war is the legendary Chinatown Ice Cream Factory in (where else but) NYC's humongous Chinatown. They're famous for creating ice cream flavors with an Asian twist. Besides the obligatory vanilla, chocolate and strawberry, their regular flavors include lychee, green tea, pandan, black sesame and PB&J (yes, you read that right. PB&J!). The shop's mascot is this Godzilla-like green dinosaur with red flames eating ice cream; kinda weird, but oh-so Asian. Craving for a South-East Asian flavor, I opted for a scoop of the pandan ice cream. Pandan is a leaf that is used in South-East Asian cuisine as an aromatic addition mostly in curries and rice dishes, sort of like lemongrass. One of my favorite pandan-flavored food is the ever-popular pandan chiffon cake (which I hope to make soon!), so I was intrigued at the prospect of pandan ice cream. Well, I'm always thrilled at the prospect of any ice cream, really... but anyway, the ice cream has a very light but distinctive pandan flavor. It was pretty subtle and I personally would've liked a stronger flavor. The ice cream also has a rather chewy and less-creamy-than-normal texture, which I really like. I will definitely return to try out their other weird flavors! *evil laugh*
The last frozen treat joint we sussed out was Il Laboratorio del Gelato in Manhattan's lower East side. It was a little bit difficult to locate because the shop is very teeny but the ever-present line that extends outside the shop made it easier to spot. The patriarch got a very blah vanilla cone and the sister got a Oreo scoop. I opted for a scoop each of hazelnut (what can be more Italian than hazelnut, right?) and the more unusual maple. Both flavors were a bit too similar to exist in the same cup, I think. The hazelnut flavor was stronger, while I could barely taste the maple. The texture of the gelato was very creamy and smooth, although it melts a bit too quickly for my taste.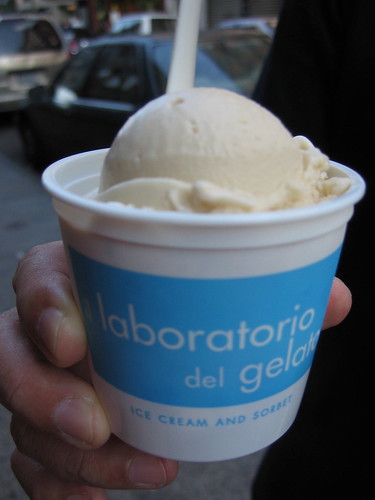
Unfortunately, I didn't have the opportunity to try out the hottest new gelateria in NYC, Grom. But hey, there's always next time and after all, my sis lives there, which is a great excuse to visit! As I mentioned above, besides the orgy of frozen treats, I also did other stuff around the city, like go to the awesome US Open! We managed to score two tickets to the women's final match on Ebay. Only my father and I went to the game because the matriarch and the sister don't share our enthusiasm for racket sports, which was cool as my father and I don't really get to spend time alone, just the of us. Although the seats were "nosebleed" seats, we still had a great view of the court.
Before the game started, we got a pretty cool bonus of having Carole King sing for us along with a local high school choir. The lone figure in black on the red carpet is Miz King rockin' the house at the Arthur Ashe stadium! Woohoo!
After that, a group of US Marines marched onto the court for a flag unveiling ceremony with the national anthem as a soundtrack. The ceremony finished with a fluorish of fireworks. Seriously, it would be sooo un-American to not end it with fireworks, no? *winks*

As you all know now, the US Open finals were dominated totally by Europeans. I was a tad disappointed because I was hoping the Venus Williams was in the final match. The women's final match was a tad predictable but was nevertheless punctutated with great plays. Unlike the men's final match (with Federer vs. Djokovic), the women's final was very one-sided and the finalists both lacked personality on court. However, it was still pretty cool to watch such a great sporting event live even though in the beginning I remarked to my father that I needed some getting used to not hearing commentary after every play, haha!
Still, it was pretty cool to be doing something enjoyable together just with my father for once. He liked it so much that after the game, we checked out the other (read: better) seats so that we know which section to get the tickets for next year. Yay!